key Ram 1500 2013 Get to Know Guide
[x] Cancel search | Manufacturer: RAM, Model Year: 2013, Model line: 1500, Model: Ram 1500 2013Pages: 196, PDF Size: 9.66 MB
Page 52 of 196

In Vehicle Features
1.Assist Call – The rear view mirror contains an ASSIST push button which
automatically connects the vehicle occupants to one of these predefined desti-
nations for immediate support:
• Roadside Assistance Call – If you get a flat tire, or need a tow, you’ll be connected
to someone who can help anytime. Additional fees may apply. Additional
information in this section.
• Uconnect® Access Care – In vehicle support for Uconnect
®Access System, Apps
and Features.
• Vehicle Care – Total support for your Chrysler Group LLC vehicle.
2. Emergency 9-1-1 Call (If Equipped) – The rear view mirror contains a 9-1-1 button
that, when pressed, will place a call to a local 9-1-1 operator to request help from
local police, fire or ambulance personnel in the event of an emergency. If this
button is accidentally pressed, you will have 10 seconds to cancel the call. To
cancel, press the 9-1-1 Call button again or press the cancellation button shown
on the touch screen. After 10 seconds has passed, the 9-1-1 call will be placed
and only the 9-1-1 operator can cancel it. The LED light on the Rearview Mirror
will turn green once a connection to a 9-1-1 operator has been made. The green
LED light will turn off once the 9-1-1 call is terminated. Have an authorized
dealer service the vehicle if the Rearview Mirror light is continuously red. If a
connection is made between a 9-1-1 operator and your vehicle, you understand and
agree that 9-1-1 operators may, like any other 9-1-1 call, record conversations and
sounds in and near your vehicle upon connection.
3. Roadside Assistance (If Equipped) - If your vehicle is equipped with this feature and
within wireless range, you may be able to connect to Roadside Assistance by
pressing the “Assist” button on the Rearview Mirror. You will be presented with
Assist Care options. Make a selection by touching the prompts displayed on the
radio If Roadside Assistance is provided to your vehicle, you agree to be
responsible for any additional roadside assistance service costs that you may
incur. In order to provide Uconnect
®Services to you, we may record and monitor
your conversations with Roadside Assistance, Uconnect®Care or Vehicle Care,
whether such conversations are initiated through the Uconnect®Services in your
vehicle, or via a landline or mobile telephone, and may share information
obtained through such recording and monitoring in accordance with regulatory
requirements. You acknowledge, agree and consent to any recording, monitoring
or sharing of information obtained through any such call recordings.
4. Bing™ -
Customers have the ability to search for nearby destinations or a point of
interest (POI) either by category or custom search by using keywords (for example,
“Italian restaurant”). Searching can be done by voice or using the touch-screen
keypad. Using the touch-screen, launch Bing™ by selecting the Apps icon, touch
Information Apps tab, and then touch Bing™. Using voice recognition press the
VR button on the steering wheel and say “Launch Bing” or just say “Bing” to launch
the app.
ELECTRONICS
50
Page 53 of 196
5.Theft Alarm Notification - The Theft Alarm Notification feature notifies you via
E-mail or text message (SMS) when the vehicle’s factory-installed theft alarm
system has been set-off. There are a number of reasons why your alarm may have
been triggered, one of which could be that your vehicle was stolen. If so, please
see the details of the Stolen Vehicle Assistance service below. When you register,
Theft Alarm Notification is automatically set to send you an E-mail at the mail
address you provide should the alarm go off. You may also opt to have a text
message sent to your mobile device.
6. Stolen Vehicle Assistance - If your vehicle is stolen, contact local law enforcement
immediately to file a stolen vehicle report. Once this report has been filed,
Uconnect
®care can help locate your vehicle. The Uconnect®Care agent will ask
for the stolen vehicle report number issued by local law enforcement. Then, using
GPS technology and the built-in wireless connection within your vehicle, the
Uconnect
®Care agent will be able to locate the stolen vehicle and work with law
enforcement to help recover it. (Vehicle must be within the United States, have
network coverage and must be registered with Uconnect
®Access with an active
subscription that includes the applicable feature).
7. WiFi Hotspot - WiFi Hotspot is on-demand WiFi 3G connectivity that's built-in and
ready to go whenever you are. Once your vehicle is registered for Uconnect
®
Access, you can purchase a Wifi Hotspot subscription at the Uconnect®Store.
After you've made your purchase, turn on your signal and connect your devices.
It's never been easier to bring your home or office with you.
• Your vehicle must have a working electrical system in order for any of the in vehicle Uconnect
®features to operate.
Uconnect® Access Remote Features
• If you own a compatible iPhone or Android
®powered device, the Uconnect®
Access App allows you to remotely lock or unlock your doors, start your engine
or activate your horn and lights from virtually anywhere (Vehicle must be within
the United States, have network coverage and must be registered with Uconnect
®
Access with an active subscription that includes the applicable feature). You
can download the App from from the Apple App or Google Play store. Visit
www.UconnectPhone.com to determine if your device is compatible. For
Uconnect
®Phone customer support and to determine if your device is compatible:
U.S. residents - visit www.UconnectPhone.com or call 1–877–855–8400.
1. Remote Start – This feature provides the ability to start the engine on your vehicle,
without the keys and from virtually any distance. You can send a request to your
vehicle in one of two ways:
• Using the Uconnect
®Access App from a compatible smartphone
• From the Mopar Owner Connect website
•
You can also send a command to turn-off an engine that has been remote started.
ELECTRONICS
51
Page 54 of 196
• After 15 minutes if you have not entered your vehicle with the key, the enginewill shut off automatically.
• This remote function requires your vehicle to be equipped with a factory- installed Remote Start system. To use this feature after the Uconnect
®Access
App is downloaded, login with your user name and Uconnect®Security PIN.
• You can set-up notifications for your account to receive an E-mail or text (SMS) message every time a command is sent. Log in to Mopar Owner Connect
(www.MoparOwnerConnect.com) and click on Edit Profile to manage Uconnect
Notifications.
2. Remote Door Lock/Unlock – This feature provides the ability to lock or unlock the
door on your vehicle, without the keys and from virtually any distance. You can
send a request to your vehicle in one of three ways:
• Using the Uconnect
®Access App from a compatible smartphone
• From the Mopar Owner Connect website
• By contacting the Uconnect
®Care on the phone
• To use this feature after the Uconnect
®Access App is downloaded, login using
your user name and Uconnect Security PIN. Touch the App button on your
smartphone with the closed lock icon to lock the door, and touch the open lock
icon to unlock the driver’s door.
• You can set-up notifications for your account to receive an E-mail or text (SMS) message every time a command is sent. Log in to Mopar Owner Connect
(www.MoparOwnerConnect.com) and click on Edit Profile to manage Uconnect
Notifications.
3. Remote Horn and Lights – It’s easy to locate a vehicle in a dark, crowded or noisy
parking area by activating the horn and lights. It may also help if you need to draw
attention to your vehicle for any reason. You can send a request to your vehicle in
one of three ways:
• Using the Uconnect
®Access App from a compatible smartphone
• From the Mopar Owner Connect website
• By contacting the Uconnect
®Care on the phone
• To use this feature after the Uconnect
®Access App is downloaded, login using
your user name and Uconnect®Security PIN. You can set-up notifications for
your account to receive an E-mail or text (SMS) message every time a command
is sent. Log in to Mopar Owner Connect (www.MoparOwnerConnect.com) and
click on Edit Profile to manage Uconnect Notifications.
ELECTRONICS
52
Page 57 of 196
Store Radio Presets
• The Presets are available for all Radio Modes, and are activated by touching anyof the six Preset buttons.
• When you are receiving a station that you wish to commit into memory, press and hold the desired numbered button for more that 2 seconds or until you hear a
confirmation beep.
• The Radio stores up to 18 presets in each of the Radio modes. Press the A-B-C hard-key to select the A, B or C preset list.
Disc Operation
• Your vehicle may have a remote CD player located in the lower center console storage bin, or in the lower center bench seat bin.
• CD/Disc Mode is entered by either inserting a CD/Disc or by touching the Media button located on the side of the display. Once in Media Mode, select Disc.
• Gently insert one CD into the CD player with the CD label facing as indicated on the illustration located on the Disc player.
Seek Up/Down Buttons
• Press to seek through CD tracks.
• Hold either button to bypass tracks without stopping.
USB/Audio Jack (AUX) Operation
USB/iPod®
• USB/iPod
®Mode is entered by either inserting a USB Jump Drive or iPod®cable
into the USB port or by touching the Media button located left of the display. Once
in Media Mode, select USB/iPod
®for the source.
• Pressing the Media button, then select USB/iPod
®to change the mode to the USB
device if the device is connected, allowing the music from your portable device to
play through the vehicle's speakers.
Audio Jack (AUX)
• The AUX allows a portable device, such as an MP3 player or an iPod
®,tobe
plugged into the radio and utilize the vehicle’s audio system, using a 3.5 mm audio
cable, to amplify the source and play through the vehicle’s speakers.
• Pressing the Media button, then touch the Source soft-key and then select AUX to change the mode to auxiliary device if the audio jack is connected, allowing the
music from your portable device to play through the vehicle's speakers.
• The functions of the portable device are controlled using the device buttons, not the buttons on the radio. The volume may be controlled using the radio or portable
device.
ELECTRONICS
55
Page 58 of 196

Uconnect® 3.0 Available Media Hubs
Uconnect
3.0Media Hub
(USB, AUX
Ports) Media Hub
(SD, USB,
AUX Ports)Remote USB
Port (Fully
Functional)Remote USB
Port (Charg-
ing Only)Dual Charg-
ing Ports
S--OO
S = Standard Equipment
O = Optional Equipment
Uconnect® 5.0
Clock Setting
1. To start the clock setting procedure, perform either of the following: • Press the More hard-key on the right side of the display, next press the Timesoft-key and then press the Set soft-key.
• Press the Settings hard-key on the right side of the display, then press the Clock soft-key. The Time setting screen is displayed and the clock can be adjusted as
described in the following procedure.
NOTE:
In the Clock Setting Menu you can also select Display Clock. Display Clock turns the
clock display in the status bar on or off.
ELECTRONICS
56
Page 59 of 196

2. Touch the Up or Down arrows to adjust the hours or minutes, next select the AMor PM soft-key. You can also select 12hr or 24hr format by touching the desired
soft-key.
3. Once the time is set press the “Done” soft-key to exit the time screen.
Equalizer, Balance and Fade
1. Press the SETTINGS hard-key on the right side of the unit.
2. Then scroll down and press the Audio soft-key to get to the Audio menu.
3.
The Audio Menu shows the following options for you to customize your audio settings.
Equalizer
• Touch the Equalizer soft-key to adjust the Bass, Mid and Treble. Use the + or - soft-key to adjust the equalizer to your desired settings. Press the back arrow
soft-key when done.
Balance/Fade
• Touch the Balance/Fade soft-key to adjust the sound from the speakers. Use the arrow soft-key to adjust the sound level from the front and rear or right and left side
speakers. Touch the Center “C” soft-key to reset the balance and fade to the
factory setting. Press the back arrow soft-key when done.
Speed Adjustable
• Touch the Speed Adjusted Volume soft-key to select between OFF, 1, 2 or 3. This will decrease the radio volume relative to a decrease in vehicle speed. Press the
back arrow soft-key when done.
Loudness
• Touch the Loudness soft-key to select the Loudness feature. When this feature is activated it improves sound quality at lower volumes.
Radio Operation
Seek Up/Down Buttons
• Press to seek through radio stations in AM, FM or SXM bands.
• Hold either button to bypass stations without stopping.
Store Radio Presets
• When you are receiving a station that you wish to commit into memory, press and hold the desired numbered soft-key for more that 2 seconds or until you hear a
confirmation beep.
• The Radio stores up to 12 presets in each of the Radio modes. 4 presets are visible at the top of the radio screen. Touching the “all” soft-key on the radio home screen
will display all of the preset stations for that mode.
ELECTRONICS
57
Page 60 of 196
SiriusXM Premier Over 160 channels
•
Get every channel available on your satellite radio, and enjoy all you want, all in one
place. Hear commercial-free music plus sports, news, talk and entertainment. Get all
the premium programming, including Howard Stern, every NFL game, Oprah Radio
®,
every MLB®and NHL®game, every NASCAR®race, Martha Stewart and more. And
get 20+ extra channels, including SiriusXM Latino, offering 20 channels of commer-
cial free music, news, talk, comedy, sports and more dedicated to Spanish language
programming.
• To access SiriusXM Satellite Radio, press the “RADIO” hard-key and then the SXM
soft-key.
• SiriusXM services require subscriptions, sold separately after the 12-month trial included with the new vehicle purchase. If you decide to continue your service at the
end of your trial subscription, the plan you choose will automatically renew and bill at
then-current rates until you call SiriusXM at 1-866-635-2349 for U.S. residents and
1-888-539-7474 for Canadian residents to cancel. See SiriusXM Customer Agreement
for complete terms at www.siriusxm.com for U.S. residents and www.siriusxm.ca for
Canadian residents. All fees and programming subject to change. Our satellite
service is available only to those at least 18 and older in the 48 contiguous USA
and D.C. Our Sirius satellite service is also available in PR (with coverage
limitations). Our Internet radio service is available throughout our satellite service
area and in AK and HI. © 2013 Sirius XM Radio Inc. Sirius, XM and all related
marks and logos are trademarks of Sirius XM Radio Inc.
Disc Operation
• Your vehicle may have a remote CD player located in the lower center console storage bin, or in the lower center bench seat bin.
• CD/Disc Mode is entered by either inserting a CD/Disc or by touching the Media button located on the side of the display. Once in Media Mode, select Disc.
• Gently insert one CD into the CD player with the CD label facing as indicated on the illustration located on the Disc player.
Seek Up/Down Buttons
• Press to seek through Disc tracks.
• Hold either button to bypass tracks without stopping.
Browse
• Touch the browse soft-key to scroll through and select a desired track on the Disc. Touch the exit soft-key if you wish to cancel the browse function.
USB/Audio Jack (AUX)/Bluetooth® Operation
USB/iPod®
• USB/iPod
®Mode is entered by either inserting a USB Jump Drive or iPod®cable
into the USB port or by touching the Media hard-key located left of the display.
Once in Media Mode, touch the source soft-key and select USB/iPod
®
ELECTRONICS
58
Page 61 of 196
•Pressing the Media hard-key, then touch the source soft-key and then select USB/
iPod®to change the mode to the USB device if the device is connected, allowing the
music from your portable device to play through the vehicle's speakers.
Audio Jack (AUX)
• The AUX allows a portable device, such as an MP3 player or an iPod
®,tobe
plugged into the radio and utilize the vehicle’s audio system, using a 3.5 mm audio
cable, to amplify the source and play through the vehicle speakers.
• Pressing the Media hard-key, then touch the source soft-key and then select AUX to change the mode to auxiliary device if the audio jack is connected, allowing the
music from your portable device to play through the vehicle's speakers.
• The functions of the portable device are controlled using the device buttons, not the buttons on the radio. The volume may be controlled using the radio or portable
device.
Bluetooth®
• If using a Bluetooth
®- equipped device, you may also be able to stream music to
your vehicle's sound system.
• Press the Media hard-key, then touch the Source soft-key. Select Bluetooth
®to
change the mode to Bluetooth®if the device is paired, allowing the music from
your portable device to play through the vehicle's speakers.
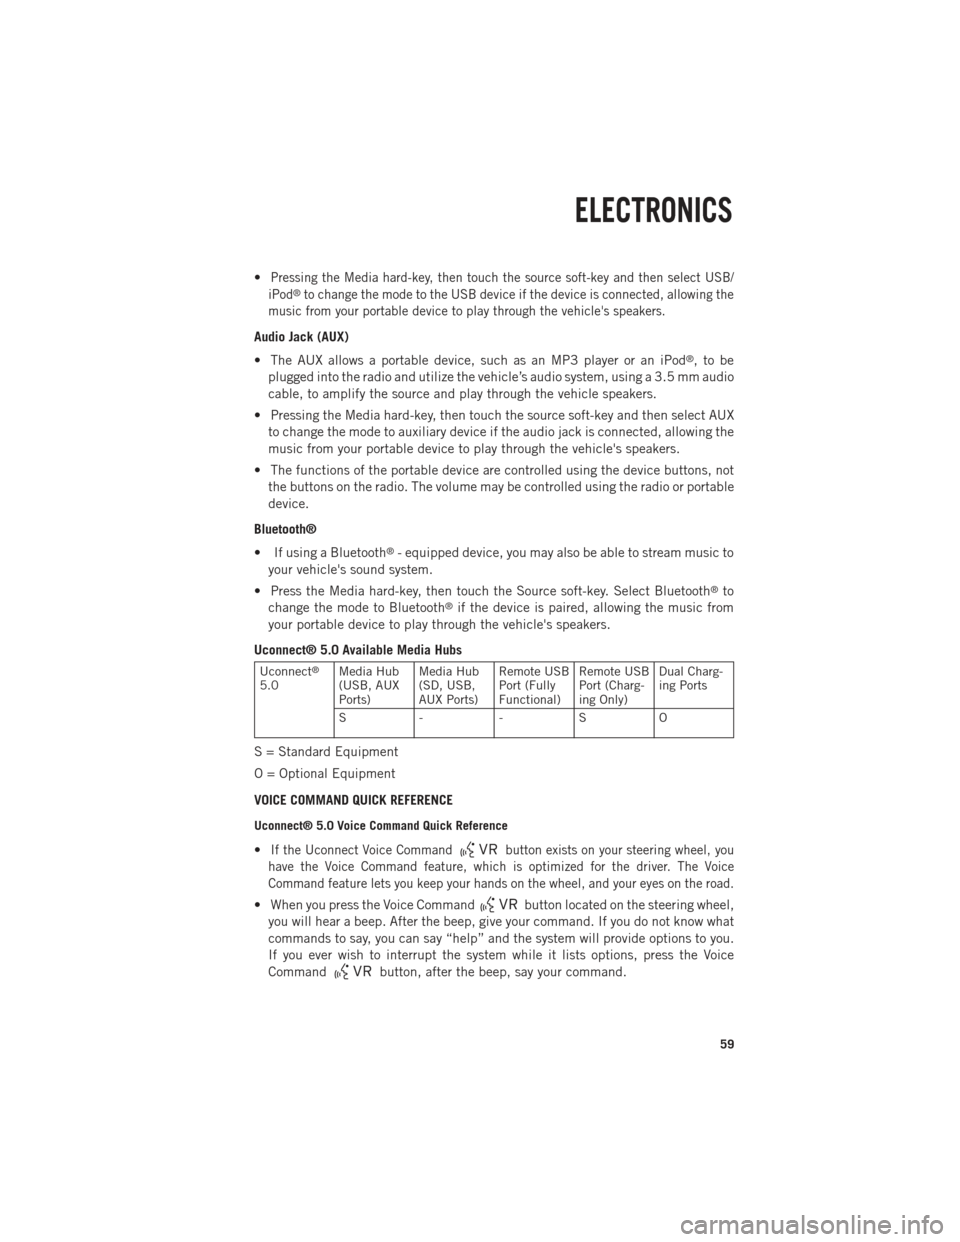
Uconnect® 5.0 Available Media Hubs
Uconnect®
5.0 Media Hub
(USB, AUX
Ports) Media Hub
(SD, USB,
AUX Ports)Remote USB
Port (Fully
Functional)Remote USB
Port (Charg-
ing Only)Dual Charg-
ing Ports
S--SO
S = Standard Equipment
O = Optional Equipment
VOICE COMMAND QUICK REFERENCE
Uconnect® 5.0 Voice Command Quick Reference
•If the Uconnect Voice Commandbutton exists on your steering wheel, you
have the Voice Command feature, which is optimized for the driver. The Voice
Command feature lets you keep your hands on the wheel, and your eyes on the road.
• When you press the Voice Commandbutton located on the steering wheel,
you will hear a beep. After the beep, give your command. If you do not know what
commands to say, you can say “help” and the system will provide options to you.
If you ever wish to interrupt the system while it lists options, press the Voice
Command
button, after the beep, say your command.
ELECTRONICS
59
Page 64 of 196
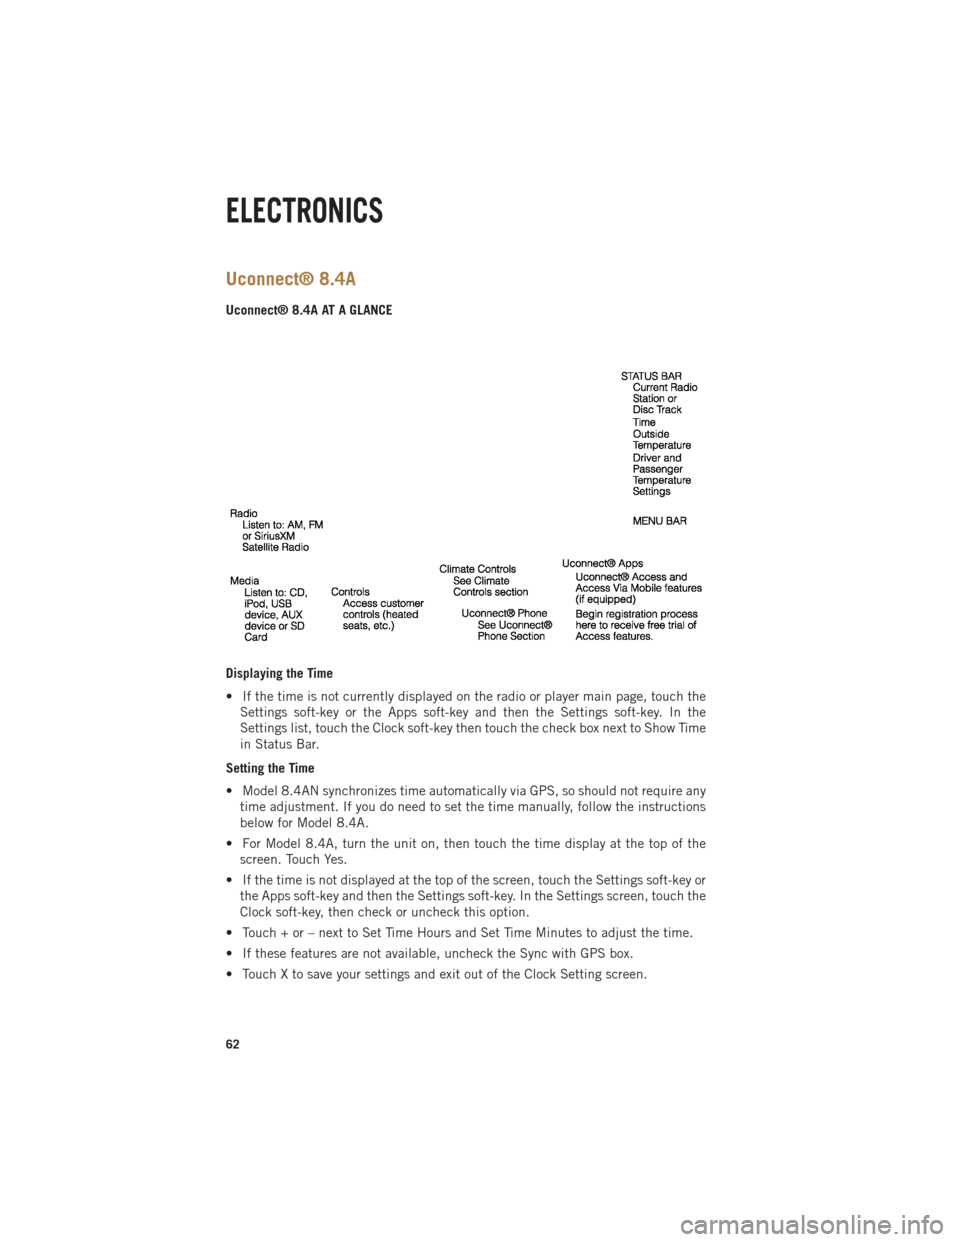
Uconnect® 8.4A
Uconnect® 8.4A AT A GLANCE
Displaying the Time
• If the time is not currently displayed on the radio or player main page, touch theSettings soft-key or the Apps soft-key and then the Settings soft-key. In the
Settings list, touch the Clock soft-key then touch the check box next to Show Time
in Status Bar.
Setting the Time
• Model 8.4AN synchronizes time automatically via GPS, so should not require any time adjustment. If you do need to set the time manually, follow the instructions
below for Model 8.4A.
• For Model 8.4A, turn the unit on, then touch the time display at the top of the screen. Touch Yes.
• If the time is not displayed at the top of the screen, touch the Settings soft-key or the Apps soft-key and then the Settings soft-key. In the Settings screen, touch the
Clock soft-key, then check or uncheck this option.
• Touch + or – next to Set Time Hours and Set Time Minutes to adjust the time.
• If these features are not available, uncheck the Sync with GPS box.
• Touch X to save your settings and exit out of the Clock Setting screen.
ELECTRONICS
62
Page 65 of 196

Audio Settings
• Touch of the Audio soft-key to activate the Audio settings screen to adjustBalance\Fade, Equalizer, and Speed Adjusted Volume.
• You can return to the Radio screen by touching the X located at the top right.
Balance/Fade
• Touch the Balance/Fade soft-key to Balance audio between the front speakers or fade the audio between the rear and front speakers.
• Touching the Front, Rear, Left, or Right soft-keys or touch and drag the blue Speaker Icon to adjust the Balance/Fade.
Equalizer
• Touch the Equalizer soft-key to activate the Equalizer screen.
• Touch the + or - soft-keys, or by touching and dragging over the level bar for each of the equalizer bands. The level value, which spans between plus or minus 9, is
displayed at the bottom of each of the Bands.
Speed Adjusted Volume
• Touch the Speed Adjusted Volume soft-key to activate the Speed Adjusted Volume screen. The Speed Adjusted Volume is adjusted by touching the + and - buttons or
by touching and dragging over the level bar. This alters the automatic adjustment
of the audio volume with variation to vehicle speed.
RADIO
• To access the Radio mode, touch the Radio soft-key at the lower left of the screen.
ELECTRONICS
63